Before you begin:
To create shifts automatically, your site must use and properly configure shift templates. If your site does not use shift templates, see Create crane work shifts manually (on page 1). See the Creating Crane Plans process for a high-level view of related tasks.
If you have set your views (on page 1) for creating crane work shifts and you have created the shift templates (on page 1), you can now create work shifts automatically. This task is part of the Creating Crane Plans process.
You can modify your shift templates any time. Work shifts are defined by the template in use when the shifts were created. To modify previously created shifts, do this: delete the shifts, modify the template (see Creating shift templates (on page 1)), and then re-create the shifts.
Make sure all vessel visits includes a valid ETA and ETD.
To create work shifts automatically using work shift templates:
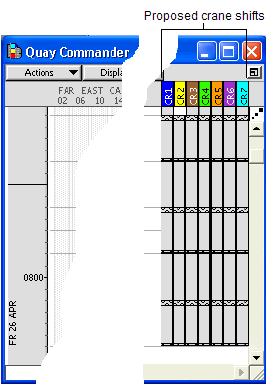
In the Quay Commander window, from the Display list, select Show Shift Automation.
XPS shows all cranes and creates the proposed shifts (based on the templates) for the duration of the vessel visit. It does not show shifts already planned for other vessels.
If the vessel visit's ETA or ETD is invalid or blank, or ETD is greater than the ETA by 10 days, XPS displays an error message when you select Show Shift Automation. You cannot override this error message. To resolve ETA/ETD issues, you must correct the vessel visit's ETA/ETD in N4.
Click shifts to cycle between a proposed (gray) and a planned (colored) state.
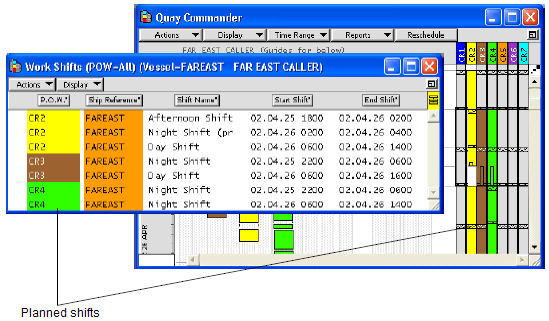
In planned state, shifts display the crane color (proposed shifts are always gray). With shift automation, XPS automatically links before and after shifts together and displays a connecting bar graphic. Linking shifts helps because any work left unfinished by the first shift is placed into the next shift.
For more information, see Linking work shifts (on page 1).
When you have planned (clicked) all the shifts, from the Display list, select Show Shift Automation again to turn off automatic shift creation.
XPS saves the planned shifts and deletes all proposed shifts.
Optionally, double-click the planned shift in the Work Shifts window (on page 1) to add staffing details and berth number to the shift. This information prints in some Quay Commander reports.
To link additional work shifts, continue with Link work shifts (on page 1). Otherwise, proceed to Assign work queues to crane work shifts (on page 1) to link specific work queues to crane work shifts.